Configuring Fail2ban in Debian/Ubuntu
19 Jan 2025, 19:16:30
In today's world of cyber threats, server security is becoming a priority for every administrator. One of the most effective tools to protect your server is Fail2ban. In this article I will share my experience in configuring Fail2ban on Debian and Ubuntu systems, as well as offer practical tips and recommendations.What is Fail2ban?
Fail2ban is software that monitors your server logs and blocks IP addresses that show suspicious activity. For example, if someone tries to repeatedly guess the password for SSH, Fail2ban will automatically block that IP address for a certain amount of time. This allows you to protect your server from brute-force attacks and other types of malicious activity.Why should you use Fail2ban?
- Protection against brute-force attacks: Fail2ban effectively protects your services such as SSH, FTP and web servers from brute-force password attacks.
- Easy customization: Configuring Fail2ban does not require deep technical knowledge and can be done even by a novice administrator.
- Flexibility: You can configure Fail2ban to protect different services and customize the blocking settings to your needs.
Installing Fail2ban
Installing Fail2ban on Debian or Ubuntu is very easy. Follow these steps:Step 1: System Upgrade
Make sure your system is up to date before installing:apt update
apt upgradeStep 2: Install Fail2ban
After upgrading, run the following command to install Fail2ban:apt install fail2ban iptablesStructure of Fail2ban
The fail2ban configuration files are located in the /etc/fail2ban/ directory:- fail2ban.conf – default settings of fail2ban service;
- fail2ban.d/*.* – custom fail2ban service settings;
- jail.conf – default jail settings for protected services;
- jail.d/*.* – custom jail settings for protected services;
- filter.d/*.* – configuring search patterns in system logs (logs);
- action.d/*.* – action settings;
- paths*.conf – settings for individual operating systems.
Configuring Fail2ban
Now that Fail2ban is installed, it's time to customize it. Customization involves modifying the configuration file to determine which services you want to protect.Step 1: Basic settings
When upgrading packages, the system may overwrite the default jail settings files, so I recommend creating custom settings files.You should also disable the default SSH protection settings in Fail2ban:
>/etc/fail2ban/jail.d/defaults-debian.confStep 2: Configuring SSH security
Create a file /etc/fail2ban/jail.d/sshd.conf with the contents:[sshd]
enabled = true
bantime = 1800
findtime = 600
maxretry = 3
- enabled - includes jail
- maxretry - maximum number of failed login attempts per findtime seconds
- bantime - blocking time in seconds
For Debian 12, you also need to add one line to correctly detect SSH:
echo "sshd_backend = systemd" >> /etc/fail2ban/paths-debian.confStep 3: Checking the service operation
This completes the configuration of jail sshd for fail2ban and the service should be restarted:systemctl restart fail2banChecking the service:
systemctl status fail2banStep 4: Checking the IP Blocking List
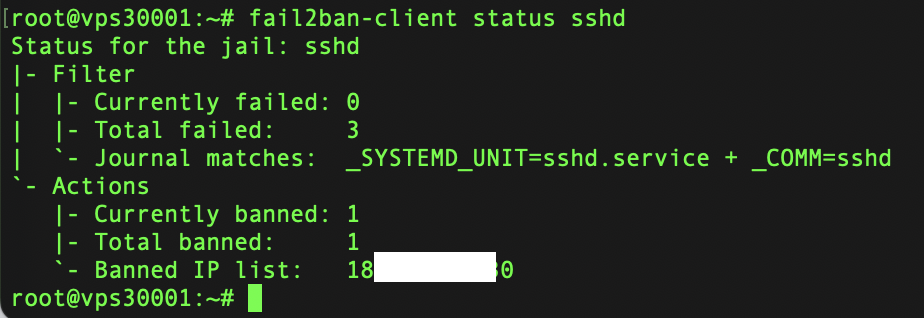
To get a list of IP address blocking by jail sshd use the command:fail2ban-client status sshd
Step 5: Managing IP blocking in jail
To unblock an IP use the command:fail2ban-client set sshd unbanip 1.2.3.4To add an IP to the “whitelist”, i.e. to prevent the IP from being blocked in the future, use the command:
fail2ban-client set sshd addignoreip 1.2.3.4To get a list of all IPs that are ignored, use the command:
fail2ban-client get sshd ignoreipAnd you can remove an IP address from this list with the command:
fail2ban-client set sshd delignoreip 1.2.3.4All these changes are temporary and will be reset when the Fail2ban service or the server as a whole is restarted.
Step 6: Managing permanent locks in Jail
Permanently blocked IPs can be written in the jail configuration file /etc/fail2ban/jail.d/sshd.confignoreip = 1.1.1.1 2.2.2.2In the ignoreip parameter, both in the jail configuration file and for temporary management, IPs are specified in a list separated by a space.
You do not need to specify your own server IPs. They are ignored by default.
You already need to restart the fail2ban service to apply these changes:
systemctl restart fail2banAnalyzing fail2ban operation
While fail2ban is running, it saves all information to the system log (log file) /var/log/fail2ban.log.I will list a few useful commands for analysis below.
A list of all blocked IPs:
fail2ban-client bannedObtaining a jail on which IP is blocked:
fail2ban-client banned 1.2.3.4A list of all blocked IPs by sshd jail:
fail2ban-client get sshd bannedFor other options to analyze or manage fail2ban, see the command output:
fail2ban-client -hBy default, fail2ban blocks using iptables. If desired, it can be reconfigured to ipset, which is preferable for large blocking lists.
And you can check the list of blocked IPs by jail sshd in firewall with the command:
iptables -nL f2b-sshd